Making an AR Game
Using AFRAME, THREE.js and WebXR to build a game during a 4.5hr live stream.
Here is a .gif of the final game, click here to play the game. It uses the WebXR DOM Overlay API, and the WebXR Hit Test API. So right now the best way to play it is in Mobile Chrome or Samsung Internet Beta.
 A virtual ball being shot into a virtual basketball hoop.
If you want to watch all four-plus hours of the live stream the URLs are here:
-
Part 1: https://youtu.be/ee7PPDmPuqY
-
Part 2: https://youtu.be/RWFQ2FqEMi4
-
Part 3: https://youtu.be/5XTDOcMU3Vg
If you want to just look through the source code here it is: AdaRoseCannon/basketball-demo Playbasket ball in AR with Aframe and the WebXR device API GitHub is home to over 50 million developers working… github.com
This was my first time live streaming a whole project from start to finish. It was fun I think I would do it again for small projects like this. In this blog post I will talk about what tools I used to make it and some of the tricks that went into it.
Setting up AFrame
First thing first is to create a new HTML file. index.html and put in some HTML boilerplate. I do this in VSCode using the Emmet Abbreviation ! to auto-fill some basic HTML.
<!DOCTYPE html>
<html lang="en">
<head>
  <meta charset="UTF-8">
  <meta name="viewport" content="width=device-width, initial-scale=1.0">
  <title>My AR Game</title>
</head>
<body>

</body>
</html>
Next to add the AFrame script I copy and paste the script tag from the AFrame docs.
<script src="[https://aframe.io/releases/1.1.0/aframe.min.js](https://aframe.io/releases/1.1.0/aframe.min.js)"></script>
And paste the AFrame hello world into the body:
<a-scene>
  <a-box position="-1 0.5 -3" rotation="0 45 0" color="#4CC3D9">
  </a-box>
  <a-sphere position="0 1.25 -5" radius="1.25" color="#EF2D5E">
  </a-sphere>
  <a-cylinder position="1 0.75 -3" radius="0.5" height="1.5" color="#FFC65D">
  </a-cylinder>
  <a-plane position="0 0 -4" rotation="-90 0 0" width="4" height="4" color="#7BC8A4">
  </a-plane>
  <a-sky color="#ECECEC"></a-sky>
</a-scene>
Testing
To test it I start a local http server to let me display it on my computer. I use the node http-server module. If you don’t have node environment to hand a couple of other options are the Chrome Web Server extension or building it on a website like glitch.com
WebXR requires a secure origin to run. Secure origins usually begin with https:// a special secure origin is http://localhost which lets you access local a http server.
If you are using Glitch you can just open the URL on the your phone to test it.
Unfortunately the requirement for a secure origin makes things tricky for testing a local server on external devices. Normally I would access the server on my development computer via IP address like so: http://192.168.0.10:8080 but since it’s not a secure origin it can’t be used for WebXR.
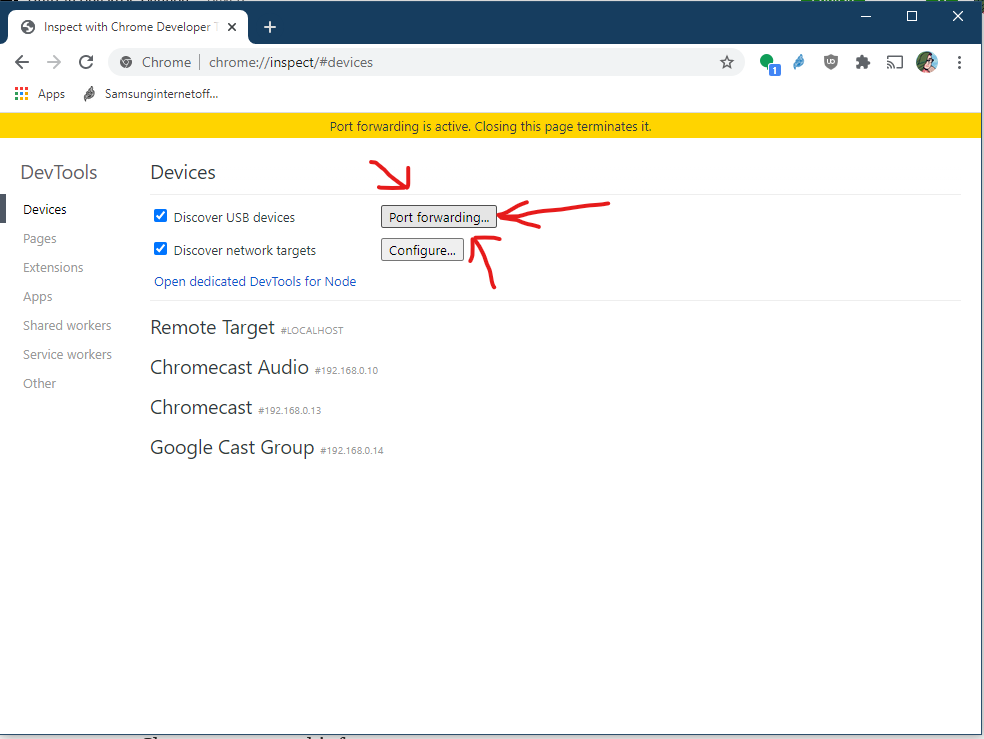
To test it on my phone there are two options which work well, the most convenient option is to plug in my phone using USB and use Chrome’s remote debugging to forward the port of the http server. Open chrome://inspect in Chrome to access this feature:
 chrome://inspect
Once that is set up you can then open up http://localhost:8080 (replace 8080 with whatever port you are using) on your phone and test like you would on your computer.
During my live streams I couldn’t get this working since I was using my phone’s USB-C port to capture the HDMI. So I used https://ngrok.com/ to get a real https: enabled URL for my local server.
Enabling AR features
The first thing to notice when you try AR in our AFRame scene is that you’ll see through the device camera briefly before it gets obscured when the scene gets shown. This is because the
To solve this we’ll add a new AFrame component to hide objects when the scene goes into AR. This code is from work done by Klaus Weidner in one of the AFrame demos:
AFRAME.registerComponent('hide-in-ar-mode', {
  init: function () {
    this.el.sceneEl.addEventListener('enter-vr', (ev) => {
    if (this.el.sceneEl.is('ar-mode')) {
      this.el.setAttribute('visible', false);
    }
    });
    this.el.sceneEl.addEventListener('exit-vr', (ev) => {
    this.el.setAttribute('visible', true);
    });
  }
})
I included this snippet in a little library of useful components I copy from project to project. As well as some other useful parts so I will just add that script to the page:
<script src="[https://ada.is/basketball-demo/ar-components.js](https://ada.is/basketball-demo/ar-components.js)"></script>
This adds a hide-in-ar-mode component and an ar-hit-test we can use in Aframe. We add the hide-in-ar-mode component to HTML elements I want to hide in AR such as the
<a-sky color="#ECECEC" hide-in-ar-mode></a-sky>
The other issue is the scale. The AFrame hello world example is designed for VR. In VR where physically large scenes work well because you can take advantage of the unlimited space. In the AFrame Hello World Example the content is placed 5 meters from the user and is 2.5m tall. This is very large and looks impressive in VR but in AR is much too big to fit in many people’s real environment.
When designing AR scenes, try to avoid having the content larger than 0.5m to enable people to fit it in their environment.
When designing AR scenes, try to avoid having the content larger than 0.5m to enable people to fit it in their environment. I say this as someone who lives in a small apartment.
The times when you want to break this rule is when the AR scene is designed to only be used outside where space is more available or when the virtual object is a stand in for a real object which has specific dimensions. Such as if they are buying a particular piece of furniture and want to see how well it fits in their house.
To update the scene I made all the objects in the scene 10% of their original size. All of the units in WebXR and AFrame are in meters so I turned 1.25m into 0.125m (12.5cm or about 6 inches.)
Adding hit testing
Hit testing allows you cast rays from the virtual content into the real world. So you can place virtual objects inline with real world objects such as the floor, tables and walls.
It will get you both the position and normal of where it hits letting objects be placed on services both vertical and horizontal.
The hit-test feature is one which is not available by default in WebXR because it lets you get additional information about a user’s environment.
But you can request it when the XR session is started in AFrame you add it to your
<a-scene webxr="optionalFeatures: hit-test;">
To assist in how it’s used I made a component to help with it in the library I mentioned earlier:
<script src="https://ada.is/basketball-demo/ar-components.js"></script>
The ar-hit-test component will continuously do hit-testing using the most relevant user input available assisting you to build something which works on a variety of hardware. Such as it will default from using the headset position but will use a VR controller or hand tracking if it is available.
Wherever the hit lands it will place the object. This makes it handy for being a targeting reticle in AR.
We’ll make a 20cm square to use for the guiding reticle:
<a-plane
 rotation="-90 0 0"
 width="0.2"
 height="0.2"
 src="./arrow.png"
 material="transparent:true;"
></a-plane>
![]() arrow.png
arrow.png
Like <div> is for HTML for AFrame it is <a-entity>. This is a plain element with no additional properties such as 3D models. We will make a new
<a-entity ar-hit-test="doHitTest:false" visible="false">

Reticle HTML goes here ...

</a-entity>
We’ve also made it invisible since the ar-hit-test component will make it visible again when it’s able to do hit-testing.
Creating the Basketball Hoop
Now we have some way of getting the position of real world objects we want to create the hoop to go on the wall.
Objects placed on surfaces using hit testing have their y-axis (the up and down axis) aligned with the normal of the surface they are being placed on. This means that objects placed on the floor should appear pretty normal but on surfaces like walls or ceilings they will get rotated. The objects are usually also rotated around this normal to face the hit-test source but this behaviour is not in the spec and so may vary.
Since an object placed on the wall will be rotated 90 degrees we will start it off with some initial rotation as we design it. So the encapsulating entity #hoop will have rotation=”90 0 0” which is similar to an object placed on a wall. If we were placing it on the floor a rotation of 0 0 0 would suffice. This rotation will be reset when we place the object against the wall to what ever the orientation of the normal of the wall is.
The hoop will be made of 3 simple shapes, a plane for the back board a torus for the hoop and an open ended cone for the net:
<a-entity id="hoop" rotation="90 0 0" position="0 2 -1.8">

    <a-torus scale="0.6 0.6 0.6" position="0 0.173 -0.1" color="#43A367" radius="0.25" radius-tubular="0.005"></a-torus>

    <a-plane
     scale="0.6 0.6 0.6"
     position="0 0 -0.3"
     rotation="-90 0 0"
     width="0.9"
     height="0.9"
     material="transparent: true; side: double;"
     src="./backboard.png"
    ></a-plane>

    <a-cone scale="0.6 0.6 0.6" position="0 0.173 -0.010" color="tomato" radius-bottom="0.25" radius-top="0.3" material="side: double; opacity:0.5; transparent: true;" geometry="height: 0.29; openEnded: true" rotation="90 0 0"></a-cone>

</a-entity>
The end result is simple but should be clear what is.
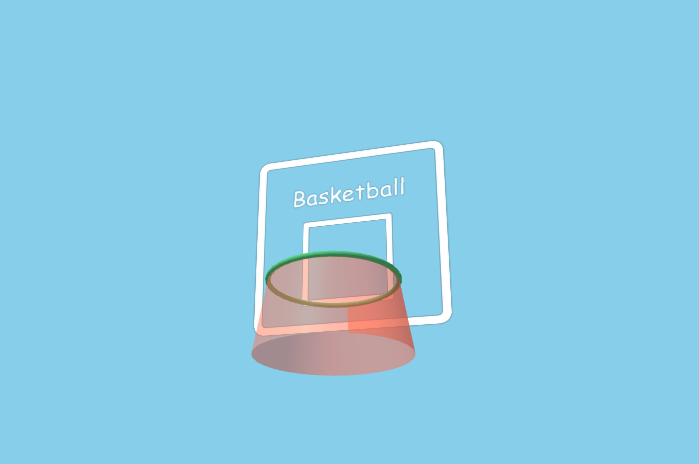 The basketball hoop created by the code earlier
Positioning the hoop
We want the player to be able to position the hoop on their wall. We can get their chosen position by copying the location from the reticle:
const reticle = document.querySelector("[ar-hit-test]");

function positionHoop() {

    hoop.setAttribute("visible", true);
    hoop.setAttribute("position", reticle.getAttribute("position"));
    hoop.setAttribute("rotation", reticle.getAttribute("rotation"));
}

reticle.addEventListener('select', function (e) {
    positionHoop();
});
This very simple function will make the hoop visible and position the hoop at the same position and rotation as the reticle when a select is made. This naive function will often make the hoop a bit crooked though as it will be tilted to face the hit-test origin but lining it up is hard. So we will need to do some Vector Math to ensure the z direction of the hoop lines up with the y-axis.
const upVector = new THREE.Vector3(0, 1, 0);
const tempVector = new THREE.Vector3();
const tempQuaternion = new THREE.Quaternion();

function positionHoop() {

    hoop.setAttribute("position", reticle.getAttribute("position"));
    hoop.setAttribute("visible", true);

    tempVector.set(0, 0 ,-1);
    tempVector.applyQuaternion(reticle.object3D.quaternion);
    tempQuaternion.setFromUnitVectors(tempVector, upVector);
    hoop.object3D.quaternion.multiplyQuaternions(tempQuaternion, reticle.object3D.quaternion);
};
This slightly more complicated function will work out the Quaternion rotation needed to rotate the reticle into an upright position. It will then set the quaternion rotation of the hoop to multiplication of that rotation with the reticle’s rotation. Resulting in a hoop that is facing the right way but twisted slightly so that it points up.
Adding physics to the scene
Physics is handled by the very useful aframe-physics-system this allows you to make the objects in the scene behave in physically realistic ways.
There are two types of physics objects:
-
Static Bodies, these do not move or react to being hit by other objects they effectively have infinite mass and are unaffected by gravity. They are cheap to use but cannot move. Anything that should not move should be a static body such as Floors and Walls and in our case the basketball hoop.
-
Dynamic Bodies, these have mass and will fall with constant acceleration under gravity. They can bounce off static bodies or collide with other dynamic bodies. The only dynamic body in the scene is the ball itself.
To set up the physics system we will include the script after the A-Frame script and add the physics component to our scene element:
<script src="https://cdn.jsdelivr.net/gh/n5ro/aframe-physics-system@v4.0.1/dist/aframe-physics-system.min.js"></script>

...

<a-scene physics="debug: false">
To help setting up your scene it can be worth while to set debug to true so that you can see the shapes it has made outlined in red.
Next we add a sphere with the dynamic-body component to be the ball:
<a-sphere id="ball" dynamic-body radius="0.1" color="orange" position="0.1 2.36 -1.5"></a-sphere>
If we reload the page the ball should fall indefinitely.
The next step is to add static-body to the floor plane so that something can stop the ball, I also made it much larger as the ball will roll when it hits it.
<a-plane
    rotation="-90 0 0"
    width="20"
    height="20"
    color="#43A367"
    static-body
    hide-in-ar-mode
></a-plane>
When we play the game we want to interact with the hoop. So next we will add static-body to the backboard plane.
What do we do about the hoop? This is a lot more complicated. The hoop is a convex object it has a pretty complex topology and the 3D model has many vertices which makes the physics very expensive.
The trick here is to have an invisible torus with as few polygons as we can manage, we make it a static body but make it invisible and place it on top of the high resolution model. This is a common trick in video games to have the physics objects with much simpler geometry than the visible objects.
<a-torus scale="0.6 0.6 0.6" static-body="shape: mesh;" position="0 0.173 -0.1" visible="false" radius="0.27" radius-tubular="0.02" geometry="radius: 0.29; segmentsRadial: 5; segmentsTubular: 12">
</a-torus>
By having the static objects of the hoop inside the hoop entity they will be kept inline with the visible objects.
AFrame Physics System also has a JavaScript API for detecting when two objects collide or setting velocities of objects. It is available on the body property of the entity we want to control as long it is a static or dynamic body.
If we want to set the position and velocity of an object such as the ball we use this method. Here is how we launch the ball from the currently active controller:
const ball = document.getElementById('ball');

  reticle.addEventListener('select', function (e) {

  // Set the ball location to the controller position
  const pose = e.detail.pose;
  ball.body.position.copy(pose.transform.position);  // {x, y, z}

  // Have an initial velocity vector of 5ms into the screen
  tempVector.set(0, 0 ,-5);

  // Set our velocity vector direction to the controller orientation
  // {x, y, z, w}
  tempVector.applyQuaternion(pose.transform.orientation);

  // set the velocity of the ball to our velocity vector
  ball.body.velocity.copy(tempVector);
});
Dom Overlay
The last thing we need is to make some UI so that the user can say when they have set the hoop position and are ready to play. We can build a normal HTML interface for this:
<div id="overlay" class="container">
  <h1>Welcome To Basketball</h1>
  <section class="overlay-content">
    <p id="instructions">Place the basket along a wall</p>
  </section>
  <div style="display: flex; justify-content: space-between; align-self: stretch;">
    <button id="go-button">Ready to Play!</button>
    <button id="exit-button">Stop AR</button>
  </div>
</div>
Then you can use it by declaring it on the WebXR component on the scene object:
<a-scene webxr="optionalFeatures: hit-test, dom-overlay; overlayElement:#overlay;" >
Using real HTML buttons and text has many benefits for the user such as working with accessibility tools, being more readable. It can be styled with regular CSS and can be coded with normal JavaScript.
Something to bear in mind though is that when the user taps on DOM Overlay Elements they will fire input events such as ‘click’ ‘mousedown’ and ‘touchstart’ events as usual but in addition will fire WebXR ‘select’ events first!
So you may need to use something like a setTimeout in your ‘select’ events to ensure that a button has not been pushed if you are waiting for input from the HTML buttons.
You can detect support for DOM Overlay by looking for xrsession.domOverlayState.type . If domOverlayState is not set then domOverlay is not present in the browser. If type is not set then the current hardware/browser configuration does not support DOM Overlay so you can use the following function to detect it:
function hasDomOverlay(xrsession) {
  if (!xrsession.domOverlayState) {
    // DOM Overlay is not supported
    return false;
  }

  if (!xrsession.domOverlayState.type) {
    // DOM Overlay is not in use
    return false;
  }

  return true;
}
If you are using DOM Overlay for essential paths through the code then you can use this to detect availability and provide fall back behaviors.
Read the source code to the finished demo
Here is the source code to the demo, I hope this guide helps you make sense of it and some of the decisions that were made. If you have further questions feel free to reach out to me through Twitter.
Thank you so much for reading! AdaRoseCannon/basketball-demo Playbasket ball in AR with Aframe and the WebXR device API - AdaRoseCannon/basketball-demo github.com