How I built a game in a week
I tried to make a game mostly using tools available on the web.
Being so short on time I built it out of off the shelf parts carefully picking my tools to build it rapidly. This blog post will introduce the tools I used and the difficulties with joining them together to make a game.
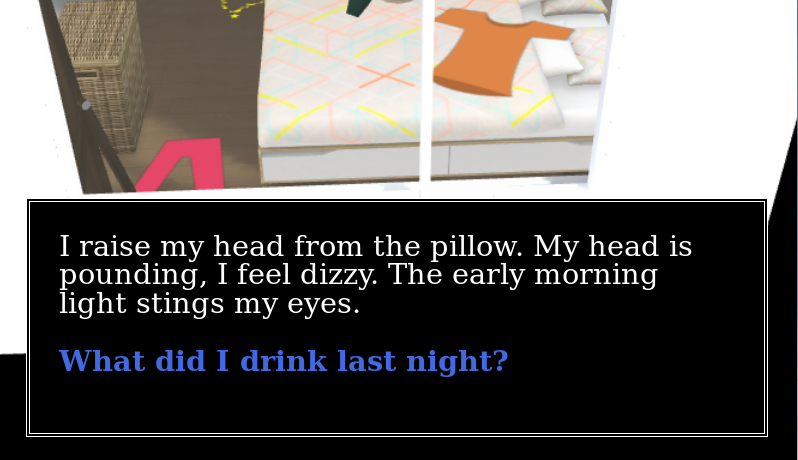
You can play it right now, in your browser with no download. It is very short, after all I only had a week to make it: I wake up with Anxiety Test Game Engine for integrating A-Frame with Twinery. Guide the character around to answer the door.ada-game-engine.adarose.dev
My goal for the game was to build a 3rd person rpg you explore either through interacting with the text or by exploring the 3D environment. Which works on phones and desktop computers.
Having only a week of weekends and evenings to put it together (about 20 hours in total) I had to pick my battles very carefully.
Firstly I picked the technologies I felt could help me build the scene fastest:
-
A-Frame — A 3D engine controlled through HTML
-
3Dio—An amazing tool for designing and exporting 3D architecture in the browser.
-
Twinery — A really fun narrative game engine designed for producing text games it exports to HTML.
-
Glitch — A service for building and hosting web software. Provides a developer environment and the capabilities for running a node server.
Of these tools Twinery is the most prescriptive as it outputs the whole HTML file, which is what I will be publishing to Glitch. Because it is the most prescriptive it is what I will have to work with to add in my 3D features.
Fortunately Twinery gives us good JavaScript injection abilities allowing me to pull in the other resources I need.
You can explore full source code by saving the webpage as a .html file and opening it here: http://twinery.org/2/
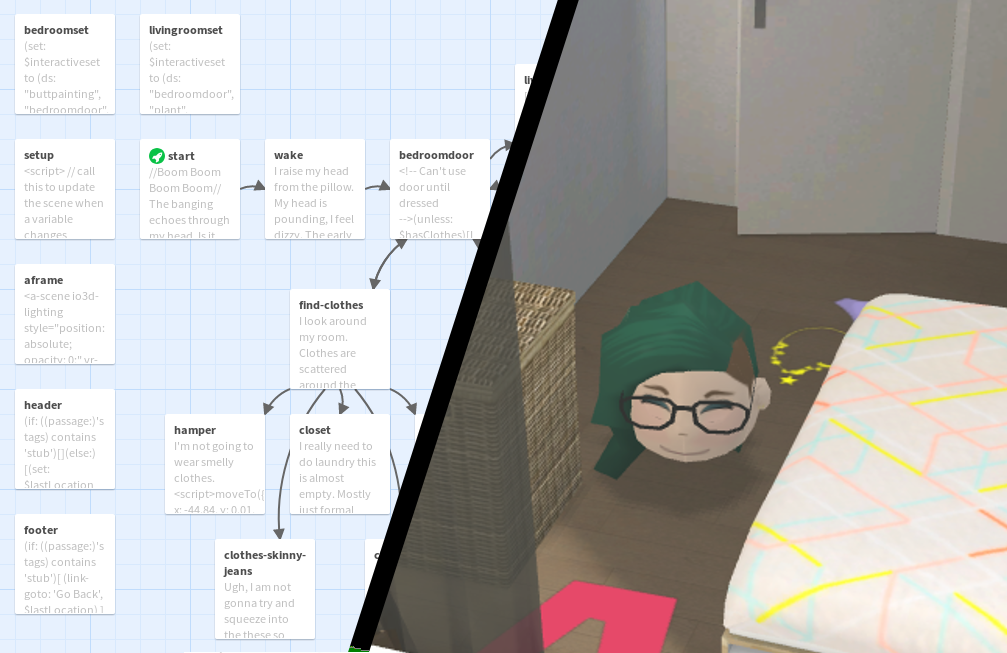
)](/images/medium/the-full-source-doed-through-the-twinery-interface.png) The full source doed through the Twinery Interface (http://twinery.org/)
The full source doed through the Twinery Interface (http://twinery.org/)
Now we have our scene I wanted to add the 3D abilities. This meant adding A-Frame. The nice thing about A-Frame is that it is controlled through HTML so I can add my scene by using JQuery to add the A-Frame JavaScript library and injecting some HTML to the top of the page.
$.getScript('[https://aframe.io/releases/0.7.1/aframe.min.js'](https://aframe.io/releases/0.7.1/aframe.min.js'))
.then(function() {
 document.body.insertAdjacentHTML('afterbegin', `
    <a-scene vr-mode-ui="enabled: false">
      <a-box position="-1 0.5 -3" rotation="0 45 0" color="#4CC3D9" shadow></a-box>
      <a-sphere position="0 1.25 -5" radius="1.25" color="#EF2D5E" shadow></a-sphere>
      <a-cylinder position="1 0.75 -3" radius="0.5" height="1.5" color="#FFC65D" shadow></a-cylinder>
      <a-plane position="0 0 -4" rotation="-90 0 0" width="4" height="4" color="#7BC8A4" shadow></a-plane>
      <a-sky color="#ECECEC"></a-sky>
    </a-scene>
`);
});
A-Frame is designed to be used for virtual reality so it provides additional controls to use it with a VR headset. My game isn’t intended to be used with VR so I disable these controls by adding vr-mode-ui=”enabled: false;” to the
The A-Frame element I inject to the top of the page is by default hidden behind the Twinery story elements so I need to use some CSS to show the 3D scene. To do this I make the
Twinery has a place to enter CSS to do this I hide the tw-story I place the tw-passage at the bottom of the screen and make the a-scene fill the whole page.
tw-story {
 background: transparent;
 pointer-events: none;
 padding: 0;
}

tw-passage {
  background: black;
  border: 4px double white;
  font-size: 1.5em;
  line-height: 1em;
  pointer-events: auto;
  margin: auto 1em 1em 1em;
  padding: 1em;
  max-height: 40vh;
  overflow: auto;
}

a-scene {
  position: absolute;
  top: 0;
  left: 0;
  transition: opacity ease 2s;
}
Now we have the funamentals set up I want to be able to control the scene from the Twinery passages.
The default scripting engine in Twinery is called Harlowe, it is designed to manage dynamic text and traversing between different passages. Here is the code in the first passage.
-
It displays some text and then some text the user can click on. If they press ‘Go back to sleep’ it replaces it with a new line of text urging the user to continue.
-
The text ‘Check it out’ is a link to anoter passage called ‘wake’
//Boom Boom Boom Boom// The banging echoes through my head.
Is it the door? Am I dreaming?
[Go back to sleep]<gosleep| [[Check it out->wake]] (click-replace: ?gosleep)[//Boom Boom Boom Boom//, the unceasing poundings, echoes in my ears.
I’m probably imagining it but I should check it out.]
If you put a script tag in here it gets executed as soon as it is written to the screen:
[Make the box green]<green|
(click-replace: ?gosleep)[The box is now green.
<script>
  document.querySelector('a-box').setAttribute('color', green');
</script>]
This can be used to control the 3D scene which is good enough for a one way binding in the scene where the 3D scene represents the game.
This wasn’t quite enough for me I want a two way binding where the clicking the text can update the scene OR clicking the scene can update the game state.
Normally the game engine doesn’t expose state or internal macros to the JavaScript but it is possible to hack access to these. This is not supported in the Harlowe game engine so I cannot garuntee it will always work:
(print: (function () {
  window.harlowe = {
   state: State,
   macros: Macros
  }
  return JSON.stringify(State, null, '  ');
 }()))
This accesses the State and Macro variables and attaches them to the window making them available from all of my JavaScript code as harlowe.state and harlowe.macros.
I can use these objects to manipulate the internal state of the game engine.
Building the Environment
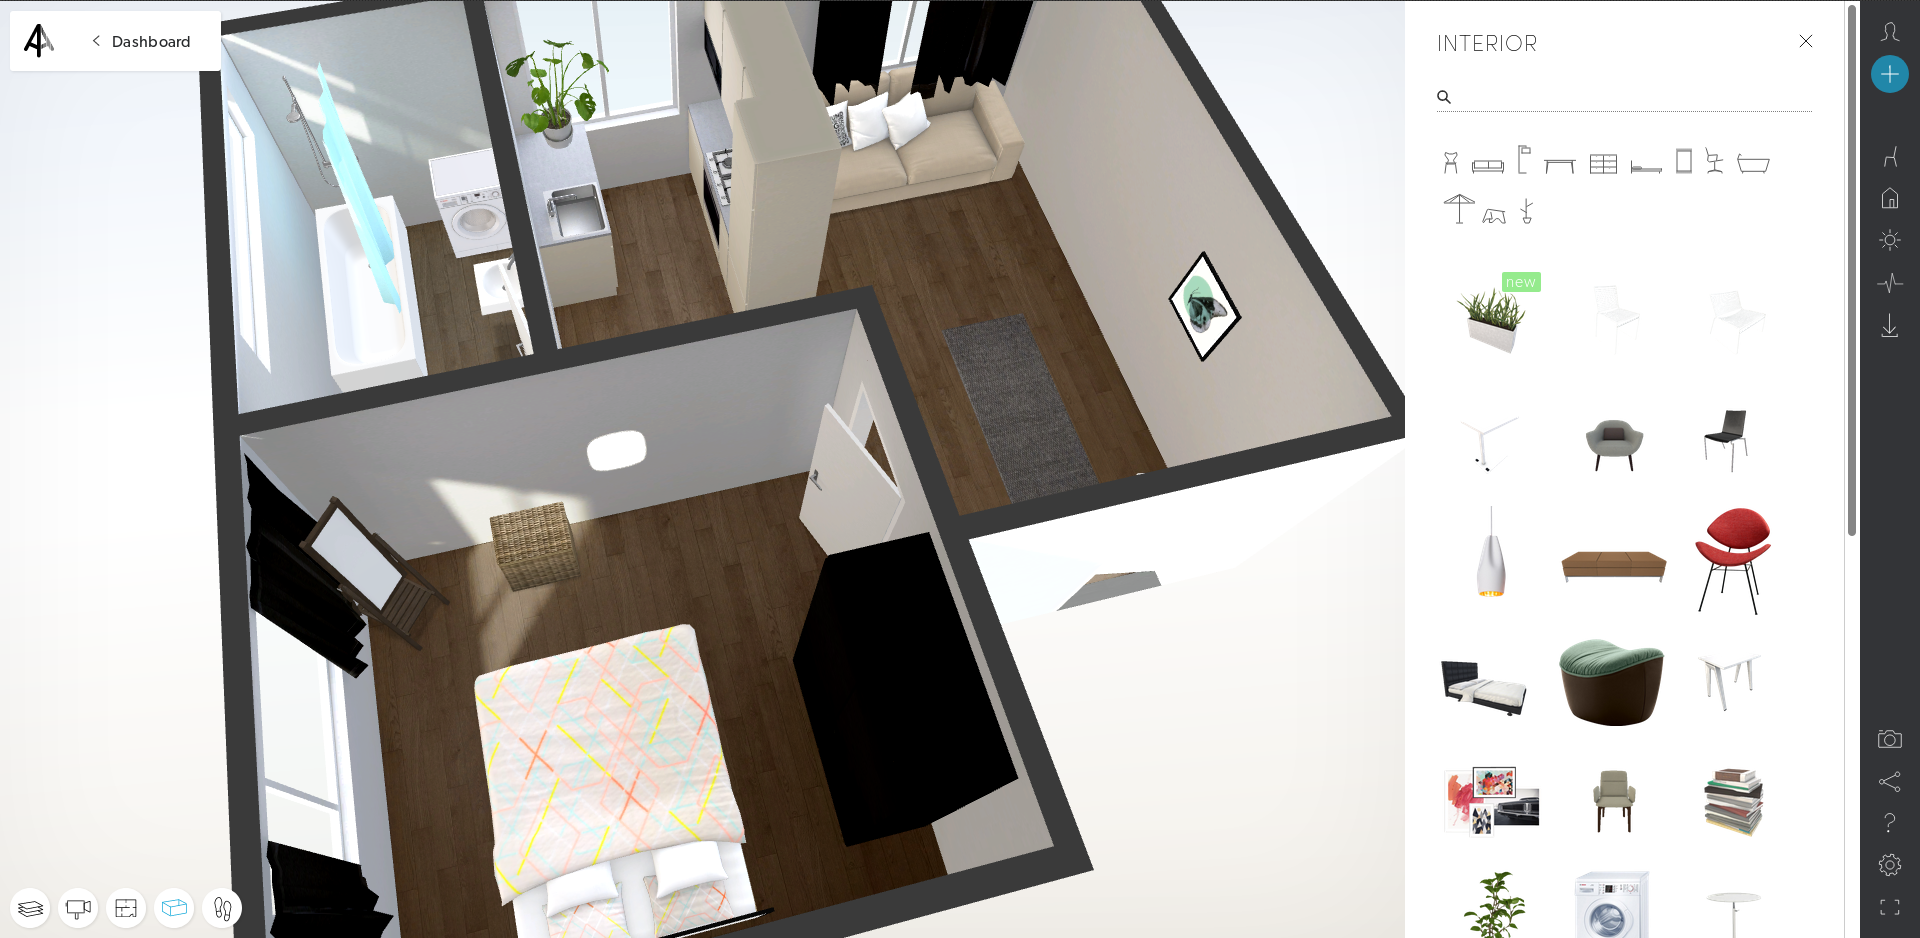
I have seen some amazing A-Frame demos made with the Architecture tools of the great Archilogic team so I knew their tools would work with my scene.
I spent a few hours building a scene. It was really fun, I felt like I was making it in the sims there was a wonderful selection of furniture.
The most amazing feature in my opinion is the lightmap baking. Once i had built my scene it could automatically generate a baked light map which looks amazing!! This is normally something which is very time consuming to set up well so having it built in as a one button feature is wonderful!
Look at the lights in the bathroom. The sunlight streaming through the shower curtain and being projected onto the wall!!
It took me a while to figure out but I was able to embed it into A-Frame scene with a few lines of JavaScript, first I add the 3dio library with $.getScript then I use it:
// I can get the sceneId from the URL (not a real uuid)
const sceneId = 'aaaaaaaa-aaaa-aaaa-aaaa-aaaaaaaaaaaa';

$.getScript('[https://dist.3d.io/3dio-js/1.1.x/3dio.min.js'](https://dist.3d.io/3dio-js/1.1.x/3dio.min.js'))
.then(function () {
  return io3d.scene.getAframeElements(sceneID);
})
.then(function (els) {
  const sceneEl = document.querySelector('a-scene');
  sceneEl.querySelector('#scene-target').appendChild(els[0]);
});
In this case the position of the scene was displaced by 40 units in the x direction making it a little awkward to use until I moved the camera starting point to compensate.
Adding interactivity
I added a 3D head to be the character it is a model I got commisioned a few months ago to use as avatar for me in VR experiences.
I wanted to move it around the scene.
<a-entity obj-model="obj: #ada-obj; mtl: #ada-mtl"
ada-model="eyes:3; mouth: 3;" position="-43.615 0.6 -0.312"
scale="0.08 0.08 0.08" shadow="cast: true; receive: false;">
</a-entity>
My first guess was to react to the use clicking on the floor and then moving the user there.
Unfortunately this often resulted in the user walking in straight lines through geometry to get places. Fortunately this can be solved with a Navmesh.
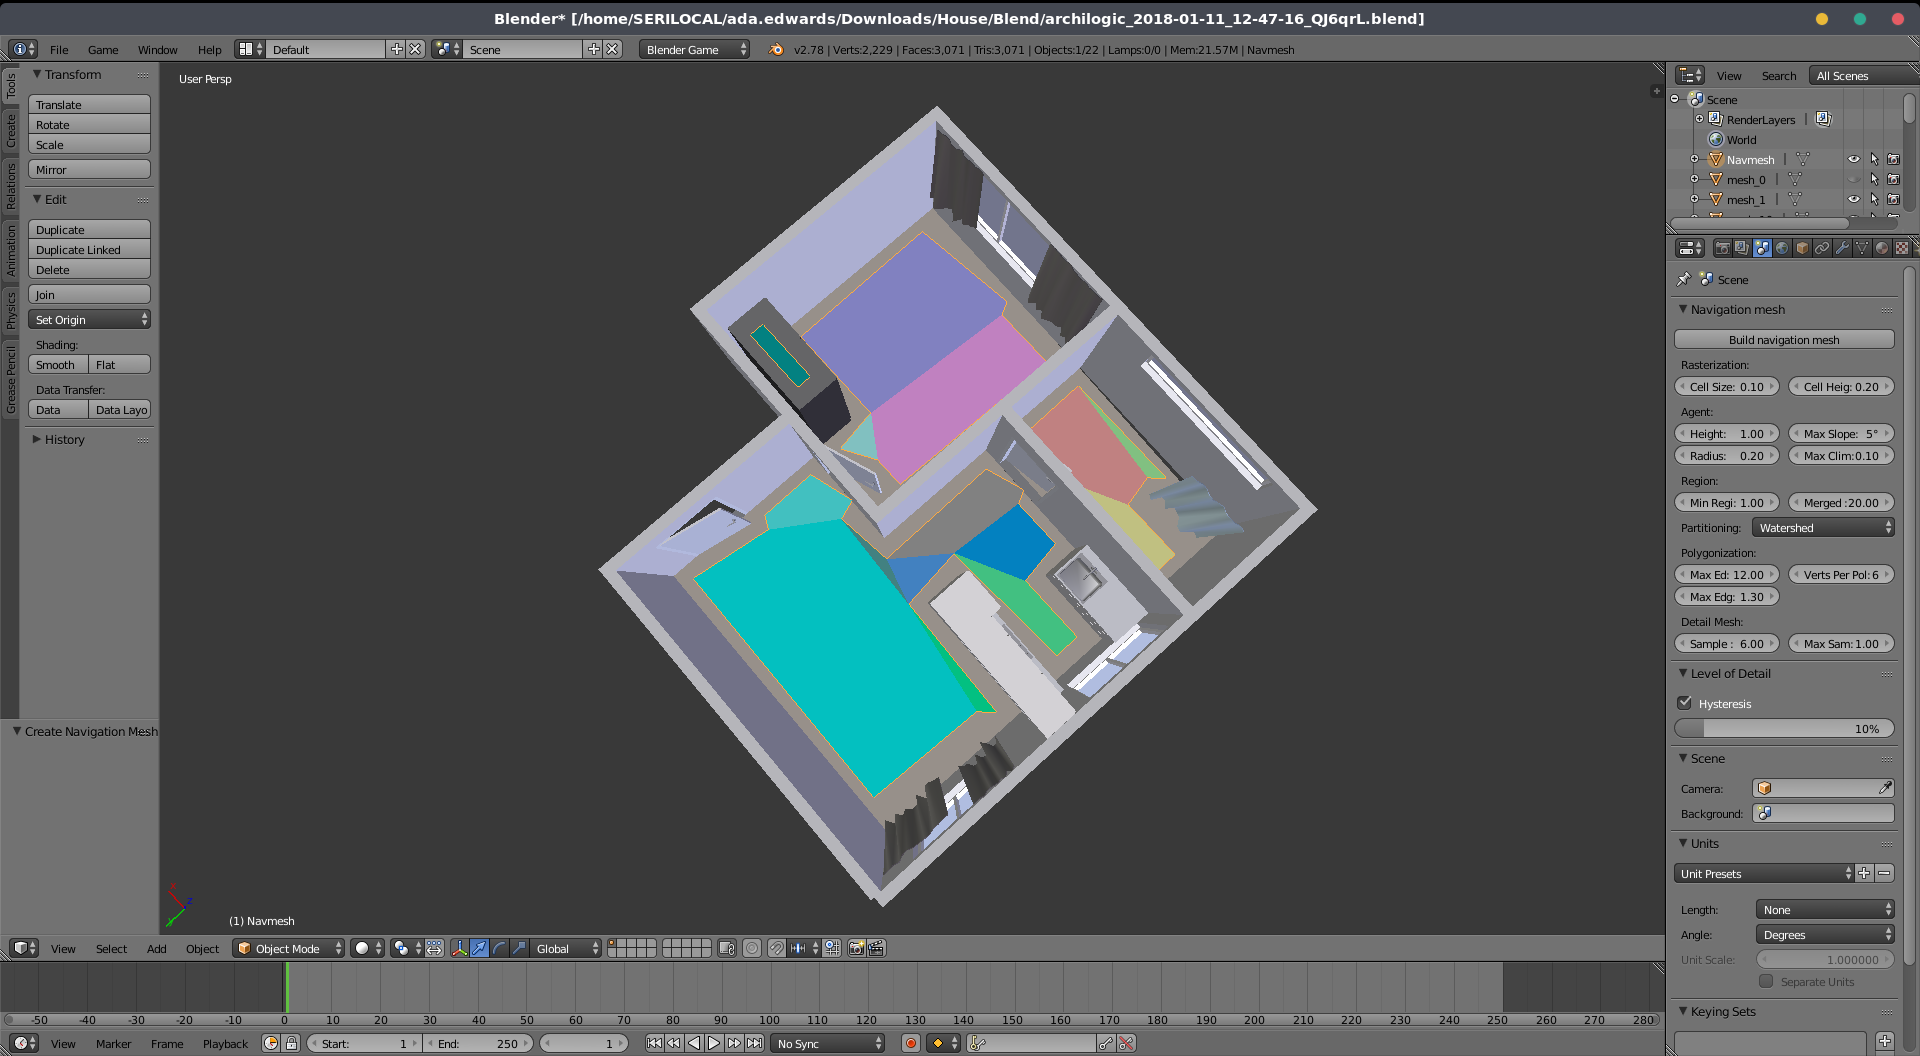
A Navmesh describes the areas of the scene a character can walk on. There are also tools to allow path finding around a Navmesh making it very useful for building explorable environments.
Don McCurdy’s amazing article on creating Navmeshes was invaluable here: Creating a nav mesh for a WebVR scene SUMMARY: This tutorial shows how to create a navigation mesh for a scene with Blender, and use it in A-Frame to do…medium.com
To generate the Navmesh for this scene I first downloaded it as an OBJ model from the Archilogic website. Unfortunately it did not download any of the furniture models with it. But it would do.
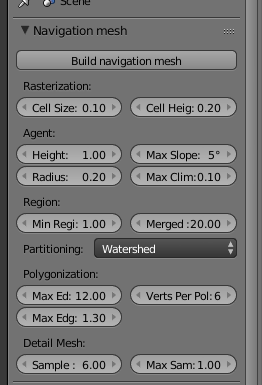 Close up of the settings I used.
I followed the tutorial and tweaked the settings to generate the Navmesh for the scene which I exported as Gltf.
I also added the scripts for the Navmesh A-Frame components to my scene so that I could make the character walk around.
As well I added a camera which would follow the user.
The final HTML I add to the page looks like this:
<a-scene
 io3d-lighting vr-mode-ui="enabled: false">

<a-assets>
  <a-asset-item id="ada-obj"
src="[https://cdn.rawgit.com/AdaRoseEdwards/metaverse/master/static/models/ada/vr-ada.obj](https://cdn.rawgit.com/AdaRoseEdwards/metaverse/master/static/models/ada/vr-ada.obj)"></a-asset-item>

  <a-asset-item id="ada-mtl"
src="[https://cdn.rawgit.com/AdaRoseEdwards/metaverse/master/static/models/ada/vr-ada.mtl](https://cdn.rawgit.com/AdaRoseEdwards/metaverse/master/static/models/ada/vr-ada.mtl)"></a-asset-item>

  <a-asset-item id="navmesh"
src="[https://cdn.glitch.com/b4fd6fd6-484f-46a9-abd9-b602f64aa92a%2Fnavmesh.gltf](https://cdn.glitch.com/b4fd6fd6-484f-46a9-abd9-b602f64aa92a%2Fnavmesh.gltf)"></a-asset-item>
</a-assets>

  <!-- Black background -->
  <a-sky color="black"></a-sky>

  <!-- character model has the id #target -->
  <a-entity obj-model="obj: #ada-obj; mtl: #ada-mtl"
ada-model="eyes:3; mouth: 3;" position="-43.615 0.6 -0.312" id="target"
scale="0.08 0.08 0.08" shadow="cast: true; receive: false;"
nav-controller="speed: 1.5"></a-entity>

  <!-- The Building Elements get injected here-->
  <a-entity id="scene-target">
  </a-entity>

  <!-- navigation mesh for the floor -->
  <a-entity gltf-model="#navmesh" nav-mesh
visible="false"></a-entity>


  <!-- orbit cam looks at #target -->
  <a-entity camera="fov: 50; zoom: 1;" position="-44 3 5"
orbit-controls="invertZoom: true; autoRotate: false; target: #target;
enableDamping: true; dampingFactor: 0.5; minDistance:4; maxDistance:20;
maxPolarAngle:1.0; minPolarAngle: 0.2; enableKeys: false; enablePan:
false;"></a-entity>

</a-scene>
We are now ready to add mouse interactions. To do this we will use a raycaster to work out where the user is clicking on the scene.
This functionality is added in a helper JavaScript file I wrote. Full source.
It is a little complex so I will break down how it works.
First I create a new rayCaster to use do the detection and I get a list of elements which I want to detect.
const raycaster = new THREE.Raycaster();
const scene = document.querySelector('a-scene');
const furniture = Array.from(document.querySelectorAll('[nav-mesh],[io3d-furniture],[io3d-closet],[io3d-door]'));
Many of the objects in the Archilogic architecture are actually invisible and their geometry has been all joined into the scene. This breaks raycasting. Fortuantely the original objects are still present so first I have to make them all visible when I do a click. Once the raycasting is complete I hide them again so they don’t accidentially get rendered.
const invis = furniture.filter(o => {
  if (!o.getAttribute('visible')) {
    o.setAttribute('visible', true);
    return true;
  } else {
    return false;
  }
});
I then configure the raycaster based upon the mouse position and current view:
const camera = scene.camera;
const mouse = {
  x: (e.offsetX / scene.offsetWidth) * 2 - 1,
  y: -(e.offsetY / scene.offsetHeight) * 2 + 1
};
raycaster.setFromCamera(mouse, camera);
We can now do the raycasting.
const intersects = raycaster.intersectObjects(furniture.map(o => o.object3D), true);
We then interate over the intersections and filter out any objects we don’t care about.
If the user clicks on an object and that object’s name matches that of a passage we jump to that passage using the macros object we hacked access too earlier:
window.harlowe.macros.get('go-to')(['', passageName]).TwineScript_Print();
If the user clicks on the floor we use the navmesh component to move the user to that location.
const ctrlEl = scene.querySelector('[nav-controller]');
ctrlEl.setAttribute('nav-controller', {
  active: true,
  destination: intersection.point
});
Now we’re ready to write some story
We’re now ready to start writing some story. There is some additional functionality I added to handle some story elements.
For example starting some passsages will trigger the character to move to walk to a new position.
There is also some functionality for limiting the interactable elements to those in the room the user currently is.
Hosting and Publishing
The server is on Glitch. Unfortunately a bug in Glitch prevented me from uploading the large HTML file. Instead I rename it and uploaded it to the assets folder as a plain text file.
To get around this I made a small custom server. When a request for the page is made it downloads the file from the CDN and injects metadata for SEO and social media before serving it to the user. It is not an optimal solution but it worked in the limited time I had.
Here is the link again if you want to play the game: I wake up with Anxiety Test Game Engine for integrating A-Frame with Twinery. Guide the character around to answer the door.ada-game-engine.adarose.dev
 For Social Media Preview